
A ceiling stain can make a roof problem feel mysterious, but the visible mark is often only the end of the water’s journey. Start inside the house, where you can look for patterns without climbing onto a wet or steep roof.
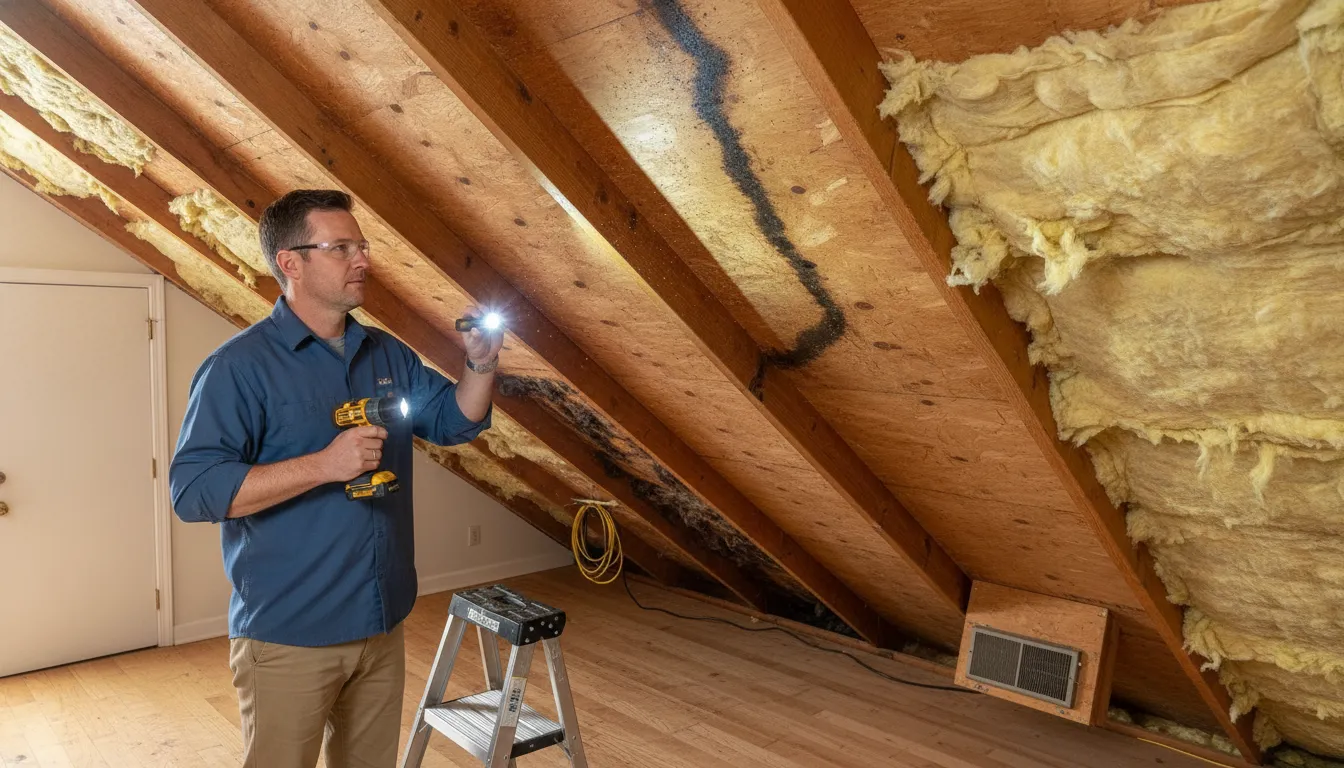
To learn how to find a roof leak from the inside, note the location of stains or damp drywall. Then inspect the attic with a flashlight for wet insulation, dark or glistening wood, water trails, or daylight. Trace moisture along rafters and roof decking, because the entry point may be uphill from the ceiling mark. If water is active, near electrical components, or accompanied by a bulging ceiling, protect people and belongings and arrange professional help rather than taking roof-level risks.
Contact Referred Restoration online if you need help evaluating the warning signs. Call (763) 726-4245 to discuss what you found.
A careful interior check can narrow the likely source, but it cannot always confirm which roof feature failed. The first clues are usually found in the rooms below, where changes in the ceiling and walls reveal whether the problem needs immediate attention.
What Are the First Signs of a Roof Leak Inside the House?
The earliest clue is often a change in a ceiling or wall, not a visible hole in the roof. Watch for a brown, yellow, or otherwise discolored ceiling stain, especially after rain or melting snow. A stain may remain after the surface dries, but it still indicates that moisture has reached the interior at some point. Take a photo and note when you noticed it and whether weather conditions changed.
Look beyond a single water stain
Damp drywall may feel soft, swollen, or cool compared with the surrounding surface. Paint can bubble, blister, crack, or peel as moisture collects behind it. You may also see a small sag or bulge in the ceiling. These changes can grow even when no water is actively dripping, so a dry surface does not necessarily mean the leak has stopped.
Active drips are easier to recognize, but they should be treated as an immediate problem. Place a container under the drip if you can do so safely, and move furniture, electronics, and other belongings away from the area. Do not press on a bulging ceiling or puncture it yourself. A water-filled section of drywall can release suddenly and spread debris or water.
Pay attention to odor and hidden moisture
A musty smell, darkened drywall, or moldy-looking area can point to ongoing or previous moisture. Mold-like growth is not proof of the leak’s location, because water can move through building materials before it becomes visible. Check nearby ceilings, walls, trim, and insulation from a safe position. Avoid disturbing a questionable area unnecessarily. If possible mold is present, use appropriate protective measures and arrange a professional assessment rather than relying on appearance alone.
Use extra caution around electrical fixtures
Water near a ceiling light, fan, outlet, switch, or visible wiring creates an electrical safety concern. Do not touch wet fixtures, wiring, or switches with wet hands. If you can reach the correct circuit breaker without stepping through water or entering an unsafe area. Turn off power to the affected circuit and contact a qualified electrician. Keep people away from the area until it has been assessed.
These signs can help you document a problem and begin how to find a roof leak from the inside, but they cannot always identify the roof entry point. Water may appear far from where it first entered, and an unclear or active leak warrants a qualified inspection.
How to Find a Roof Leak From the Inside in the Attic
An attic inspection can help you narrow down a leak without removing shingles or stepping onto the roof. The safest approach is to inspect from a stable attic access point, particularly during or shortly after rain, when fresh moisture is easier to identify. Use this process to gather useful evidence, not to replace a professional roof inspection.
- Choose a safe time and prepare your equipment. Inspect during or just after rainfall if the attic can be reached safely. Bring a bright flashlight, your phone or camera, and a marker. Wear shoes with good traction and clothing that protects your skin. Do not enter if the attic floor is incomplete or unstable, the space is too tight to move safely, or water is near electrical wiring, fixtures, or equipment. Never climb onto a wet, icy, steep, or otherwise unsafe roof to continue the investigation.
- Use the flashlight to scan the underside of the roof deck. Start at the area above the ceiling stain or drip, then widen your view. Shine the light across the underside of the roof deck, rafters, and framing rather than looking only straight ahead. Water damage may appear as dark stains, glossy or glistening wood, white mineral deposits, or an active drip. A leak may be small or intermittent, so a dry surface does not prove that the roof is sound.
- Check the insulation without disturbing it unnecessarily. Look across the top of the insulation for wet, matted, compressed, or discolored patches. Damp insulation can point to a leak even when the roof decking looks dry. Avoid pulling apart large areas or handling material that may contain mold. If you see visible mold or extensive moisture, leave the area and arrange a professional assessment rather than spreading debris or exposing yourself to contaminants.
- Turn off the attic light and look for daylight. With your flashlight briefly off, inspect the roof deck for pinpoints of daylight. Daylight can indicate a gap or opening, but not every visible point means rain is entering there. Ventilation openings and designed roof features may also allow light. Note the location and compare it with stains, damp insulation, or water trails before drawing a conclusion.
- Trace wet marks toward the highest visible point. Follow stained wood, damp framing, or the path of a drip upward along the roof slope. Water can move along rafters, joists, or sheathing before it reaches the ceiling, so the wettest spot may not sit directly above the interior stain. Stop when the trail becomes dry and note whether the area lines up with a vent, chimney, skylight, valley, or pipe penetration. The attic can identify a general area, but it may not prove the exterior entry point.
- Mark and photograph what you find. Take clear photos of stains, wet insulation, dark or glistening wood, daylight, and active drips. Include a wider photo showing the location within the attic, then mark the suspected area only if doing so does not require reaching across an unsafe surface. Record whether the evidence appeared during rain, after rain, or when the attic was dry. These details help a roofer compare the interior findings with the roof surface and determine the next step.
If you cannot move through the attic safely or the source remains unclear, stop there. An interior inspection is useful for documenting symptoms, but forcing access or testing the roof yourself can increase the risk of injury and additional damage.
How Do You Trace Water From a Ceiling Stain to the Roof?
The visible stain is a clue, not a map. Water can enter at one point on the roof, then move along rafters, joists, roof sheathing, insulation, or other framing before it reaches the ceiling. That is why learning how to find a roof leak from the inside often requires tracing the moisture uphill instead of inspecting only the area directly above the stain.
Start by documenting what you can see from inside the home. Photograph the stain from several angles, and note whether it is discolored, damp, bubbling, or actively dripping. If the area is growing, mark the outer edge lightly with a pencil and add the date. This gives you a simple way to tell whether the damage is spreading after the next storm.
Follow the trail uphill
If attic access is safe, use a flashlight and inspect the ceiling area above the stain. Look for damp insulation, darkened wood, water droplets, staining, or a glossy trail on the underside of the roof deck. Then follow each visible mark upward toward the roof peak. Check both sides of nearby rafters and the top edges of joists, because water may change direction when it meets a framing member.
Do not assume the first damp spot is the entry point. A dry trail also does not prove that the roof is sound. Water may have entered during an earlier rainfall and dried before you inspected it. Or the leak may occur only when wind-driven rain reaches a particular flashing, penetration, or shingle area. The Virginia Cooperative Extension explains that identifying a leak can require following how water moves through the roof system, rather than looking only directly above the interior damage: see its roof maintenance guidance.
Mark and photograph each clue
As you trace the path, photograph the suspected route and mark the approximate location of damp or stained framing. Record the distance from a fixed reference, such as an attic access opening, vent, chimney, or exterior wall. These notes help a roofing professional compare the interior evidence with roof features above it.
Keep the inspection limited to areas you can reach safely from a stable attic surface. Do not step on drywall or ceiling surfaces, and do not climb onto a wet, icy, steep, or otherwise unsafe roof. If the trail is unclear, the ceiling is bulging, water is near electrical equipment, or active leaking continues, stop the inspection and arrange a qualified assessment.
Which Roof Features Should You Check From Inside?
Once you find a ceiling stain or damp area in the attic, look for the roof feature that lines up with the water path. The visible mark may be several feet away from the actual entry point because water can travel along sheathing, rafters, and other framing before it reaches the interior. That is why learning how to find a roof leak from the inside is useful for narrowing the search, but not for proving the repair.
Many roof leaks are flashing leaks rather than failures in the roofing material itself, according to Virginia Tech Extension guidance. Use the comparison below as a set of clues. Inspect only from a stable, safe interior location, and do not climb onto a wet or steep roof to confirm what you see.
| Inside clue | Likely exterior feature | What to consider |
|---|---|---|
| Darkened wood, damp insulation, or staining near a roof intersection | Flashing around a wall, dormer, or roof penetration | Failed or displaced flashing can let water enter even when shingles look intact. |
| Moisture or staining near a small pipe opening through the roof | Plumbing vent boot or vent flashing | The rubber boot, metal flashing, or seal around the pipe may have deteriorated. |
| Water marks near the chimney side or framing around the chimney | Chimney flashing, counterflashing, or masonry joint | Water may enter along the uphill side and travel before becoming visible. |
| Staining or dampness beneath a roof window | Skylight flashing, seal, or surrounding roof material | Check the corners and the framing around the opening, not just the center of the stain. |
| Wet insulation or streaks below a roof slope junction, especially after winter weather | Roof valley or ice dam area | Snow and ice can redirect meltwater beneath roofing materials. Review ice dam prevention for Minnesota-specific context. |
| Staining along the upper edge of an interior wall or near a sloped ceiling | Roof-to-wall transition or step flashing | Water can move sideways along framing, so the wall location does not identify the exact entry point. |
Record the location, direction of any streaks, and whether the area is wet, discolored, or actively dripping. Take photos before the area dries, then compare the timing with rain, snowmelt, or wind-driven weather. These observations help a roofer test the right exterior features instead of assuming the stain marks the source.
Treat the table as diagnostic guidance, not a definitive diagnosis. Condensation, plumbing leaks, and ice-related moisture can resemble roof leaks. If the source remains unclear, damage is spreading, or water is near electrical fixtures, stop the inspection and arrange a qualified assessment.
What Can You Do Safely Before a Roofer Arrives?
Once you see signs of a leak, focus on limiting damage and gathering useful information. Interior steps can help you understand how to find a roof leak from the inside. But they should not put you near live electrical components, unstable ceilings, mold-contaminated materials, or a dangerous roof surface.
- Contain water without putting yourself in danger. Place a bucket or other stable container beneath an active drip, and use towels to control splashes on finished surfaces. If the ceiling is bulging, do not stand directly underneath it or puncture it. A water-filled ceiling may release suddenly, and the drywall could be heavier or less stable than it appears.
- Move furniture and protect belongings. Relocate furniture, electronics, rugs, and other vulnerable items away from the affected area. Cover items that cannot be moved with plastic, while leaving enough space for a professional to inspect the ceiling and surrounding surfaces. Do not seal damp materials so tightly that trapped moisture cannot escape.
- Stay away from electrical hazards. If water is near a light fixture, outlet, switch, appliance, or visible wiring, do not touch the wet area or electrical equipment. Keep children and pets away. If it is safe to do so from a dry location, shut off power to the affected circuit. Otherwise, contact a qualified electrician or emergency service rather than attempting to investigate.
- Photograph and record what you find. Take wide photos showing the room and close photos of stains, peeling or bubbling paint, damp drywall, drips, and any attic observations. Note when you first noticed the problem, whether it worsens during rain or snowmelt, and where water appears. A visible stain may not sit directly below the roof entry point because water can travel along framing before reaching the interior. As the Virginia Cooperative Extension explains in its guidance on roof leaks: water may follow a path before appearing inside.
- Use care around possible mold. Avoid disturbing or brushing mold-like growth, saturated insulation, or crumbling drywall. If you choose to inspect a small, accessible area, use appropriate safety gear recommended for possible mold exposure. The University of Georgia checklist, which incorporates EPA safety guidance, recommends appropriate protective equipment when investigating possible mold: review the mold and moisture inspection safety guidance. Stop if the area is extensive, strongly odorous, or causing irritation.
- Do not climb onto the roof. Wet shingles, ice, steep slopes, and storm debris can make a roof unsafe. Do not use a ladder to reach a suspected leak area during active weather. Keep your inspection to dry, accessible interior spaces, and tell the roofer what you observed, including any suspected location near a vent, chimney, skylight, or wall intersection.
Contact Referred Restoration online or call (763) 726-4245 to discuss what you found.
When Is a Roof Leak an Emergency?
A roof leak needs prompt attention when water is actively entering the home, damage is spreading, or the leak creates a safety risk. You can often observe conditions from a dry, stable area inside the house. But you should not climb onto a wet roof or enter an unsafe attic to investigate. Interior observations can help document the problem, but they cannot make exterior repairs safe.
Signs that call for immediate caution
- Water is near electricity. If water is dripping from a light fixture, ceiling fan, outlet, or electrical panel, keep clear of the area. Do not touch wet switches or fixtures. If you can safely reach the appropriate breaker without stepping through water, turn off power to the affected circuit and contact a qualified professional.
- The ceiling is bulging. A sagging or swollen section of drywall may be holding water. Keep people and furnishings away from it, and do not puncture the bubble. The ceiling can fail without much warning.
- Damage is spreading. Fast-growing stains, active dripping, damp insulation, or water moving down a wall indicate that the problem is not limited to an old cosmetic mark. Use containers to catch drips only when you can do so without standing beneath an unstable ceiling.
- A storm has damaged the roof. Missing shingles, fallen branches, hail impact, or other visible storm damage can allow more water in during the next rain. Observe from the ground or through a window. Do not climb up to confirm the damage.
- The attic is unsafe. Stop investigating if the space has standing water, unstable flooring, exposed wiring, heavy mold growth, poor visibility, or signs of structural damage. Wear appropriate protective equipment around suspected mold, but protective equipment does not make an unstable area safe.
Know when to stop looking
Stop an interior inspection if you must walk on ceiling drywall, move across questionable framing. Work near live electrical components, or reach into an area you cannot see clearly. Leave exterior inspection and repair to a qualified roofing professional, especially during rain, wind, ice, or other hazardous conditions. If the source is unclear, photographs of the stain, ceiling bulge, attic conditions, and visible exterior damage can help with the assessment.
Keep a record of when the leak began and what was affected. The roof insurance claim process article explains why organized documentation can be useful when discussing storm damage with your insurer. For repair-focused next steps after the immediate hazard is controlled, see the guide to roof shingles leak repair.
Frequently Asked Questions
How do I find a roof leak from the inside without removing shingles?
Start with the attic if it is safe to enter. Use a flashlight to inspect the underside of the roof deck, rafters, insulation, and areas around vents or other penetrations. Look for damp or dark wood, wet insulation, water trails, glistening surfaces, or daylight. If you cannot enter safely, inspect ceiling stains and other interior signs from below and arrange a professional assessment.
Can I trace a roof leak to its source from the attic?
Often, but not always. Water can travel along roof sheathing, rafters, or other framing before it reaches the ceiling, so the entry point may be uphill or offset from the visible stain. Trace the damp path upward, then compare it with nearby flashing, vents, valleys, chimneys, and pipe penetrations. Water travel can make an interior stain misleading, as described by Virginia Cooperative Extension: roof leak tracing guidance.
What should I look for in an attic during a rainstorm?
Watch for active drips, wet or glistening wood, fresh water trails, damp insulation, and areas where water collects around a penetration. Use a flashlight and stay on stable attic flooring or framing designed for foot traffic. Do not touch wet electrical components, and leave the area if conditions become unsafe.
Is it safe to inspect a roof leak from the inside by myself?
A limited interior inspection may be reasonable when the attic is dry, accessible, and structurally safe. But do not climb onto the roof, walk on wet surfaces, or investigate near exposed wiring. If you see mold or extensive moisture, use appropriate safety gear; University of Georgia guidance recommends protective equipment when inspecting possible mold growth: mold and moisture inspection checklist. Stop and call a qualified professional if the source is unclear or damage is active.
Contact Referred Restoration for the Next Safe Step
If the leak source remains unclear, or water is still entering the home, an experienced evaluation can help clarify what to do next without unsafe roof access. Contact Referred Restoration online to discuss the signs you found and plan a safe response. You can also call (763) 726-4245 if speaking with the team is more convenient.